After making deer meat into dried beef with the smoke house and getting an interest now in making deer hams, I began to re-acquire my interest in archery again. Also watching my daughter get into archery, kill her first deer with a bow helped some. Also her ragging on me about when I would shoot my bows and how I couldn’t do it helped pushed me into it also, but we will not tell her that.
Before I was ever writing anything on this blog I was known as a primitive archery guy, aside from the beer making, and spent most of my time building bows and focusing on arrow making. I got so tried of telling people how to make qualities arrows I started writing a book, instead of typing it on the internet all the time. I eventually moved on to other things and figured the amount of information I wanted would never be gathered in my life time. If you want to read all of that I dropped it all on a companion blog called The Bowyer’s Den.
Anyway, I had this bow that I had made back around 2001 when I was fully committed to primitive archery. It was meant to be a copy of a 47″ Sioux bow, but the engineering brain got in the way and Sioux bows only drew 21″ t 23″ normally. You know that time while you are waiting for the water to boil and your sipping that beer and thoughts cross your mind “What if I did this..” I thought, If I recurved the tips it would be able it draw longer than 22 inches, so I boiled the tips and bent them. Then after being done I thought, if I deflexed it in the center it could stay strung all day long while hunting and never weaken. So I dropped it on the grill and heated it and bent it over my knee. What happened with that bow is what you see here that can be drawn to 26″ and only had a brace weight of about 5#, maybe.

Now I have the bow and I need some arrows. I had a bunch of Southern arrowwood shafts I gathered years back that had been laying around the house since I moved and changed everything rebuilding the house we bought. I did not take pictures of them rough before straightening, but they where sticks with the bark scraped off. I put them over a candle and use bacon grease to keep the shafts from burning and heated the spots that needed bent. I used my arrow wrench (See the Bowyer’s Den for more information on this) to straighten them.
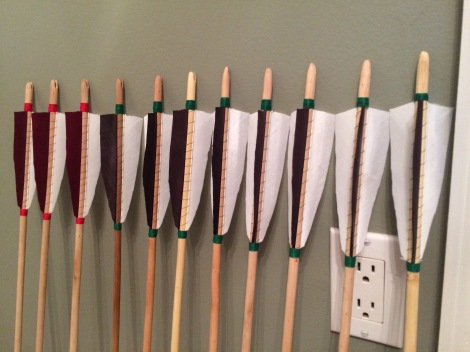
Once straightened and having the points set on them they looked as you see below.

These are with 125 grain points. I tried using 145 grain points but when bare shaft testing the nocks hit left on the target, meaning they were under spined. I changed to 125 grain points and the nocks shot inline just a tad high. My bow is 55 pound and the arrows are spined to 45 pounds to clear the bow. The 145 grain points made them perform like 40 pound arrows. Again, if you want more in depth, read the other blog.
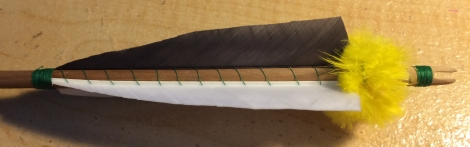
Then I got out the fly tying bobbin and wrapped down the back end of the three feathers. I then worked the thread forward through the feather to the front. Wrapped and set the front and tied it into a knot. Below you see fletched arrows partially produced. Black cock feathers are for targets and Red for broadheads.
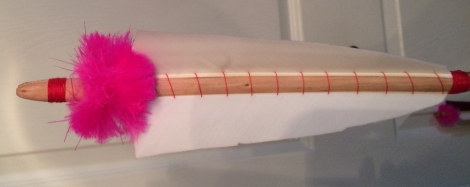
Next, I saw this really cool method of adding Marabou to the back of your arrow. It makes it easy so you can see where they hit every time. If you want to read about it yourself, that can be found here. I changed to white feathers years back as Barred Turkey feathers were too hard to see and this far exceeds other way of seeing exactly where your arrows hit. Pink feathers are not 1/4 as visible as this marabou ring is as to where it hit.
What the broadhead arrows look like from the back.

One of the target “field points” arrows from the side.
Field point from the back

Now, I’m really starting to love these arrows. This broken nock was done just before I bound the nocks were bound and did the fluffy markers. I had to start shooting them as I was so excited. I was getting better quickly and I shot one and said “Wow, that sounded funny.” Then you find out you split and arrows because you are too impatient to bind the nocks. All shooting quit until the nocks where bound now.

Now I can shoot, but I can’t kill deer with target points. I needed broadheads and I know someone will be disappointed they are not stone. I never bothered to learn to Knapp as stone points are not legal in Maryland, so I can’t hunt with them. If I can’t hunt with them, I don’t have a huge interest in making them. These are cut out of old circular saw blades and drilled for the sinew to bind them. The hole is a copy of Susquehannock copper points I saw that did not have a tang. The tang helps bind them in, but the hole stiffens it a bit and I really like the look of it.

Some broadheads hafted into the shafts.

One bound with wet sinew and a dried piece of pounded sinew next to it. I still wrapped an extra wrapping farther down the shaft after this.

One old shaft and three new ones all with broadheads set and dried.

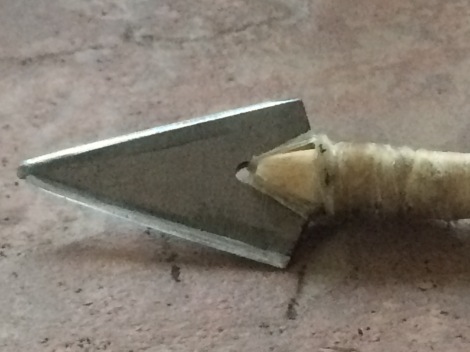
The next part is the hard part with sharpening the heads. The ones above are just rough ground and set. The one below after being set is taken to the belt sander and sanded to make sure the bevel on the blades is close just like a knife maker would do. Only then can it go the the soft stone to be polished into an edge that can cut paper under light pressure.
If you look at the difference between this picture and the top broadhead picture you can see the top has rough grinding lines. This picture, even tough a bit grainy, shows a nice polished sharpened edge ready to hunt with.
Thanks for reading and feel free to ask questions.

Hey Rob…. Dave Omak….
LikeLike
Is there a “special” wood used for arrows ?? Nice work.. I love the arrowheads… Love the maribou… you could catch fish with those..
LikeLike
Hey Dave, there is a ton of different arrows woods, as used by Indians. Here is a list from my other blog about wood I have tried or researched a bit. I planned on writing a book, but gave up on finishing it or trying to self publish it. https://boweyrsden.wordpress.com/2014/02/18/9-shafting-materials/
LikeLike